Inhaltsverzeichnis
Wii Remote / Wiimote
MS-Win only: Johnny Chung Lee: http://www.wiimoteproject.com/
Vorbereitung: Ubuntu mit Wiimote
Maus, Lightpen, etc. Ubuntu mit Wiimote als Maus, Keyboard, Lightpen etc.
Quelle1)
Connect a Wii Remote to your PC Using Linux
Although linux is getting more and more user-friendly al lot of things cost most time and effort than you are used from Windows. But in return you will be able you modify all code and thus your Wii Remote behavior. So don't be scared, just follow the instructions and you will soon be making weird gestures in front of your linux pc.
Be sure to have BlueZ installed, this is the official linux bluetooth-stack. It's in installed by default on Ubuntu 7.0.4.
You can use the hcitool to scan for bluetooth devices in range and get their bluetooth address. Press button 1 and 2 on the Wii Remote simultaneously and type „hcitool scan“. This will give you something like:
jos@ubuntu:~$ sudo hcitool scan
 Password:
 Scanning ...
         00:19:FD:C3:28:80       Nintendo RVL-CNT-01
 jos@ubuntu:~$
To connect to your Wii Remote just type:
jos@ubuntu:~$ sudo hidd --search
 Searching ...
         Connecting to device 00:07:61:64:A2:98
Or use the bluetooth address you have obtained with hcitool:
sudo hidd –-connect 00:19:FD:C3:28:80
After being connected to the PC the Wii Remote LEDs will continuously flash.
Disconnect with:
sudo hidd --unplug 00:19:FD:C3:28:80
WMD
WMD stands for 'Wanna Mote Dammit' and provides functionality to use your Wii Remote as a mouse and generates keyboard events for buttons. WMD is written in python which is very easy to modify. You can get it at http://ForTheWiiN.org. ForTheWiiN.org seems to be down, you can download wmd-0.1.2.tar.gz here.
Assuming python is installed on your sytem you will need the following packages:
python-bluez
python-xlib
python-pygame
In Ubuntu you can simply install these using:
sudo apt-get install python-bluez python-xlib python-pygame
WiiLi states that pyOSD, OSD, py-numpy, py-numpy-ext and python-matplotlib are also required. But in the current version (0.1.2) of WMD the use is disabled or obsolete, see WMD_DESIGN.txt in wmd-0.1.2.tar.gz.
Then check if the uinpit kernel module is loaded. Just use lsmod to check wich modules are loaded. Ubuntu needed the module to be loaded manually, this done with the modprobe command.
Here is how to check if the module is loaded, then load the modules and check again:
jos@jos-ubuntu:~$ lsmod | grep input
 jos@jos-ubuntu:~$ sudo modprobe uinput
 jos@jos-ubuntu:~$ lsmod | grep input
 uinput                 10240  0
 jos@jos-ubuntu:~$
In Config.py edit the parameters UINPUT_DEV and MY_WIIMOTE_ADDR so that they match your system. Now we are ready to run WMD: sudo python WMD.py
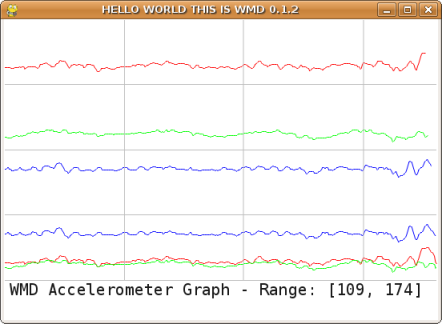
When all is right you will be shown graph:
The console windows will show some logging and if the Wii Remote has the sensor bar (or any other infrared light source) in sight the mousepointer will be taken over.
The design of WMD is pretty clear and allow you to add your own module with some knowledge of Python.
CWiid
CWiid is a collection of Linux tools written in C for interfacing to the Nintendo Wiimote. CWiid consists of three components:
- libcwiid - API to integrate the Wii Remote into your application
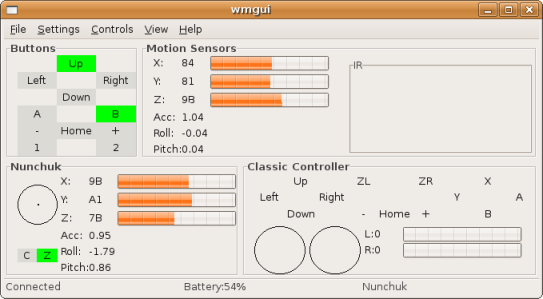
- wmgui - a graphical representation of all the a data gathered by the Wii Remote
- wminput - event/mouse/joystick driver that allows you to emulate mouse joystick and keyboard events
First get the packages required for CWiid:
sudo apt-get install libbluetooth2 bluez-utils original-awk bison flex libbluetooth2-dev autoconf mouseemu libgtk2.0-dev python2.5-dev
Having done that it is time to donwload, compile and install CWiid:
wget http://abstrakraft.org/cwiid/downloads/cwiid-0.6.00.tgz
 tar -zxvf cwiid-0.6.00.tgz
 cd cwiid-0.6.00/
 ./configure
 make
 sudo make install
 sudo ldconfig /usr/local/lib/
Start wmgui by typing 'wmgui'. Connect the Wii Remote via 'File' → 'Connect', then set all mark under the 'Settings' menu.
To control the mouse close wmgui and start wminput. To do this you need root rights or allow acces to /dev/input/uinput:
jos@ubuntu:~$ sudo sh -c 'echo "KERNEL==\"uinput\", GROUP=\"admin\"" > /etc/udev/rules.d/50-cwiid-input.rules'
 jos@ubuntu:~$ sudo /etc/init.d/udev restart
wminput takes control over the mouse and uses the tilting sensors in the Wii Remote to emulate the mouse which is not really comfortable.
To use the sensorbar (or any other infrared source) add somelines to xorg.conf. Somewhere near the other InputDevice sections add:
Section "InputDevice"
         Identifier      "Wiimote"
         Driver          "evdev"
         Option          "Name"          "Nintendo Wiimote"
EndSection
In the ServerLayout section add:
InputDevice "Wiimote" "AlwaysCore"
Restart X (safest way is to reboot your system), log back in and type:
wminput -c ir_ptr
Now can use the use the Wii Remote the way you are used in the Wii menus!
Quelle2)
It's worth noting that if the Wii is turned off, so is the sensor bar, so you have to have it turned on. This means that if your Wiimotes are paired with your console, when you press 1 and 2, they'll automatically link to the console, rather than your computer.
I'm currently working round this by pressing the red button under the battery cover instead of 1 and 2 to enter discoverable mode. I'm planning to go and pair one of my Wiimotes with someone else's console, so I won't have to do that.
If you want to change the config files, they're in /usr/local/etc/cwiid/wminput - it'll load „default“ unless something else is specified. After install, default is linked to acc_ptr, so the acclerometers control the pointer. buttons contains the mappings for the buttons to keys, and is linked by the other config files. I've made a new config file, which is basically a copy/paste from buttons and ir_ptr:
#IR pointer

Plugin.ir_ptr.X = ~ABS_X
Plugin.ir_ptr.Y = ~ABS_Y

#buttons

Wiimote.A               = BTN_LEFT
Wiimote.B               = BTN_RIGHT
Wiimote.Up              = KEY_UP
Wiimote.Down    = KEY_DOWN
Wiimote.Left    = KEY_LEFT
Wiimote.Right   = KEY_RIGHT
Wiimote.Minus   = KEY_BACK
Wiimote.Plus    = KEY_FORWARD
Wiimote.Home    = KEY_HOME
Wiimote.1               = KEY_SPACE
Wiimote.2               =

#Nunchuk.C              = BTN_LEFT
#Nunchuk.Z              = BTN_RIGHT
#
#Classic.Up             = KEY_UP
#Classic.Down   = KEY_DOWN
#Classic.Left   = KEY_LEFT
#Classic.Right  = KEY_RIGHT
#Classic.Minus  = KEY_BACK
#Classic.Plus   = KEY_FORWARD
#Classic.Home   = KEY_HOME
#Classic.A              = BTN_LEFT
#Classic.B              = BTN_RIGHT
#Classic.X              =
#Classic.Y              =
#Classic.ZL             =
#Classic.ZR             =
#Classic.L              =
#Classic.R              =
But I'm currently having a few problems with it. The up/down/left/right maps aren't working - up currently does a print screen, the other three don't do anything apparent. I'm not sure where to go with this at the moment. Still, I can control mplayer with it, and that's the main thing - for now!
There are a couple of things I'm not quite happy with here. The first is having to run wminput as a superuser. I'm sure it should be possible to run it as a normal limited user, and if anyone knows why it doesn't work, I'd love to hear it! Also, I'd like to find a way to disassociate my controllers from my console, so that they don't automatically link to it whenever it's on.
Hope this howto's useful, if you get it working, please post and let me know! If you do anything cool or extra, also please let me know, and I'll add it in here somewhere. If you have problems … well, please feel free to post. I'll do my best to help, but it may be beyond me!
I'm still fairly new to Linux (been using it about 8 months now), so my understanding is still a little limited. With that in mind, I'd appreciate it if anyone who knows a bit more about this than I do could tell me if I've done anything wrong, missed anything out, or done anything I didn't need to. I will, of course, update this post as required.
Quelle3)
3) Wiiwanna Motte Dammiit WMD version 0.1.2 can be downloaded from here: http://forthewiin.org/ . Bush can't find his WMD's, I hope you can. Now the juicy part: Once extracted, navigate to /wmd-0.1.2/wmd. Use Gedit or Kwrite to edit Config.py.
Insert the adress of your Wii Remote into line 15 Next step that has caused me to delay this tutorial by a few days, I apologise sincerely, I had problems with finding the directory of uinput in openSuSE, which turned out to be the same as in Feisty. Once you are sure you have uinput installed on your computer (should be pre-compiled in Ubuntu and OpenSuSE):
in line 37, change 'UINPUT_DEV': „/dev/misc/uinput“, to 'UINPUT_DEV': „/dev/input/uinput“, save the file and exit
Exclamation The following step can be risky, if it fails, you will not log on your computer to a window manager. I then changed xorg.conf to acommodate the Wii Remote as an input device. I have not done it any other way, so please try to ommit this step and tell me if it worked without changing xorg.conf.
cd /etc/X11 (for the record, a shortcut I took was by pressing the Tab key, as in; cd /e TAB X TAB) become root cp xorg.conf xorg.conf.backupBeforeWii (making a copy of xorg.conf is always recommended, if X fails after your reboot, just reverse this step as root: cp xorg.conf.backupBeforeWii xorg.conf) Gedit or Kwrite xorg.conf
In Section „ServerLayout“ , after the keyboard and mice, add: InputDevice „Wiimote“ „AlwaysCore“ after the last Section „InputDevice“ add: Section „InputDevice“ Identifier „Wiimote“ Driver „evdev“ Option „Name“ „Nintendo Wiimote“ EndSection save, exit and restart your machine. Exclamation
Open the console, cd to the folder /wmd-0.1.2, become root, type: modprobe uinput python WMD.py press buttons 1+2 on the Wii Remote with the batteries inserted. Remember about the 2-4 sources of Infrared radiation I mentioned in the beginning. You can create an infrared LED bar by following guides in wiili.org forums.
If all went well, you should be a proud owner of a cool gadget to impress friends with. I justified this expense as a tool to navigate slides while doing presentations Smile
cWiid is an interface GUI for the Wii Remote. It also allows you to see the battery charge, accelometer, IR and nunchuk data. Ubuntu has a .deb package that can be accessed fom the top menu bar. Otherwise, from: http://abstrakraft.org/cwiid/ become root and do: ./configure make make install
With all dependencies fulfilled, you can execute the program by typing wmgui.


